

本文来自我们社区里的开发者Zac Holland,原文链接: Getting started with Loom, Truffle and Unity
我未来几个星期的目标是用Loom编写一个区块链游戏。我心目中的最佳组合是用Truffle来做合约开发,用Unity来为客户端赋予血肉。 我刚刚花了8个小时来确定好怎么做。从Loom的团队和社区里获得了很多帮助,于是我决定把自己的开发进程记录在这里,好帮助那些有可能在卡在这个地方的人。
第一步:安装loom
这个部分非常简单。只需在 这里选择适合你操作系统的教程 ,一步步做就可以了。安装好以后启动Loom即可。(loom run)
第二步: 配置好你的项目目录结构
我的项目目录看起来像这样:

第三步:在dappchain目录配置好Truffle
在 dappchain 目录里,我跟着 这个教程 完成了一个truffle项目的架构配置。
只需要进入那个目录,然后运行yarn deploy, 就可以把你的合约部署到你的 Loom 链上了。
注意: 如果部署报错不成功,原因可能有这些:
1: 可能无法连接到你的Loom 节点。如果你在另外一台电脑或者虚拟机中运行Loom节点,确保在 truffle.js 或者truffle-config.js 中的IP地址设置对了。
2: 一些Truffle和Solc的版本与Loom不是很兼容。确保你的Truffle版本是 v4.1.8, Solc的版本是 v0.4.23。
第四步: 在unityclient文件夹里配置好Unity项目
在unityclient文件夹里,我下载好了 Unity 3D SDK 直接Clone仓库放进去即可,目前还没有可用的Unity包)。
第五步:让Truffle 给你导出合约的ABI和地址
首先,进入你的Unity项目,创建Assets/Resources/contracts/abi 和 Assets/Resources/contracts/address 目录。
你的合约数据将导出到这两个文件夹。
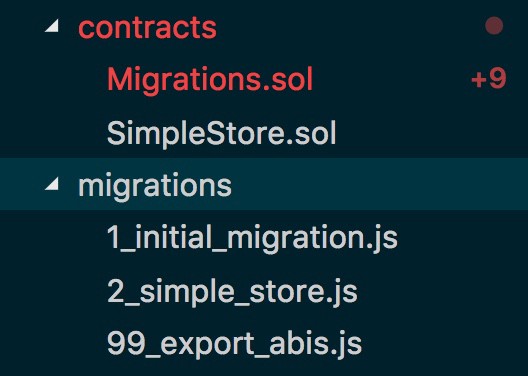
然后回到你的Truffle项目,在你的migrations 目录添加一个名为99_export_abis.js 的文件。现在你的项目应该看起来像这样

你每次的部署和迁移都会在你的 migrations 目录里面调用,而这个 99 文件将确保它是最后一步。这些文件看起来应该像这样:
// 2_simple_storage.js
const fs = require('fs')
const path = require('path')

var SimpleStore = artifacts.require("./SimpleStore.sol");

const unityAddresses = path.resolve(__dirname, '../../unityclient/Assets/Resources/contracts/address')

module.exports = function(deployer) {
  deployer.deploy(SimpleStore).then(() => {
    // Write the abi to a new file in the unityAbis directory
    fs.writeFileSync(path.resolve(unityAddresses, "SimpleStore.txt"), SimpleStore.address)
  });

};
// 99_export_abis.js
const fs = require('fs')
const path = require('path')
const contracts = path.resolve(__dirname, '../build/contracts/')
const unityAbis = path.resolve(__dirname, '../../unityclient/Assets/Resources/contracts/abi')

module.exports = async function(deployer, network, accounts) {
    let builtContracts = fs.readdirSync(contracts)
    // loop over every contract
    builtContracts.forEach(contract => {
        // Get the JSON for a specific contract
        let json = JSON.parse(fs.readFileSync(path.resolve(contracts, contract)))
        // Extract just the abi
        let { abi } = json
        // Write the abi to a new file in the unityAbis directory
        fs.writeFileSync(path.resolve(unityAbis, contract), JSON.stringify(json.abi))
    });
}
如果你的项目配置得和我的一模一样,那么这样就会很好运行。但是如果你的文件名和目录名不一样。请确保你相应修改了上面的文件。
另外,也要确保你运行了 yarn deploy 或者 yarn deploy:reset 来确保这些 ABI和地址文件放进了 Unity 项目的目录。
第六步:配置好你的Unity场景
新建一个场景,在新场景里面创建一个空的游戏对象,给其添加一个新脚本,起名为SimpleStoreHandler。看起来应该是这样:

你的SimpleStoreHandler脚本代码应该如下:
using System;
using System.Threading.Tasks;
using UnityEngine;
using Loom.Unity3d;
using Loom.Nethereum.ABI.FunctionEncoding.Attributes;

public class SimpleStoreHandler : MonoBehaviour {

    // Select an ABI from our project resources
    // We got these from the migration script in Truffle
    public TextAsset simpleStoreABI;
    public TextAsset simpleStoreAddress;

    // Use this for initialization
    public async void Start () {
        // Generate new keys for this user
        // TODO - Either store these or let the user enter a private key
        var privateKey = CryptoUtils.GeneratePrivateKey();
        var publicKey = CryptoUtils.PublicKeyFromPrivateKey(privateKey);

        // Get the contract
        var contract = await GetContract(privateKey, publicKey);
        // Make a call
        await StaticCallContract(contract);
    }

    // Get's the contract as an object
    async Task<EvmContract> GetContract(byte[] privateKey, byte[] publicKey)
    {
        // Get the writer and reader for the Loom node
        var writer = RPCClientFactory.Configure()
            .WithLogger(Debug.unityLogger)
            .WithWebSocket("ws://127.0.0.1:46657/websocket")
            .Create();
        var reader = RPCClientFactory.Configure()
            .WithLogger(Debug.unityLogger)
            .WithWebSocket("ws://127.0.0.1:9999/queryws")
            .Create();

        // Create a client object from them
        var client = new DAppChainClient(writer, reader)
            { Logger = Debug.unityLogger };

        // required middleware
        client.TxMiddleware = new TxMiddleware(new ITxMiddlewareHandler[]
        {
            new NonceTxMiddleware
            {
                PublicKey = publicKey,
                Client = client
            },
            new SignedTxMiddleware(privateKey)
        });

        // ABI of the Solidity contract
        string abi = simpleStoreABI.ToString();
        // Address of the Solidity contract
        var contractAddr = Address.FromHexString(simpleStoreAddress.ToString());
        // Address of the user
        var callerAddr = Address.FromPublicKey(publicKey);
        // Return the Contract object
        return new EvmContract(client, contractAddr, callerAddr, abi);
    }

    public async Task StaticCallContract(EvmContract contract)
    {
        if (contract == null)
        {
            throw new Exception("Not signed in!");
        }

        Debug.Log("Calling smart contract...");

        int result = await contract.StaticCallSimpleTypeOutputAsync<int>("get");
        if (result != null)
        {
            Debug.Log("Smart contract returned: " + result);
        } else
        {
            Debug.LogError("Smart contract didn't return anything!");
        }
    }
}
代码已经注释得很好了,如果你有任何问题,可以问我们。
总结:测试 试着运行你的Unity项目。你应该能看到来自Loom的消息和数据。 如果你遇到任何问题,欢迎来问我们。我们将收集大家的问题并尝试作出解答。希望这些步骤不是很难。
一些错误信息和解决方法:
Exception: JSON-RPC Error -32603 (Internal error): name is not registered
如果你在Unity里面遇到这个问题,意味着你在尝试用名字来访问你的合约,请尝试使用它的地址来访问。 只有Go-loom 插件可以用名字访问, Solidity虚拟机合约只能用地址来访问。在这里你只需要用第六步里面的代码第58行来用你的合约地址来实例化你的EvmContract
源代码: