
Purpose
If your contract inherits from other contracts and uses import statements, you must flatten the source code into a single file before deploying and verifying it. This guide walks you through the process of flattening and getting your smart contract verified on the Loom block explorer.
Prerequisites
- Node.js 10 or higher (recommended v10.15.3)
To check out if Node.js is installed on your computer, fire up a terminal and type the following command:
node -v
If Node.js is already installed, you'll see something like the following printed out to the console:
v10.15.3
If Node.js is not installed, or you're running an older version, you can download the installer from this page.
- Git
To check if Git is installed on your computer, enter the following command:
git --version
If Git is not installed, follow the instructions from the Installing Git page to install it on your computer.
Setting Things Up
For the scope of this tutorial, we'll be using the Loom Examples repository. You can make it available locally by typing the following in a terminal window:
git clone https://github.com/loomnetwork/loom-examples.git && cd loom-examples
Now that you've cloned the Loom Examples repo, let's install the dependencies:
npm install
To deploy to Loom Testnet we'll be needing a private key. You can generate it with:
npm run gen:loom-key
This will create a new private key and save it into truffle/loom_private_key.
truffle-flattener
Usually, when you write a smart contract, you would want to include some dependencies. Let's take the MyLoomCoin contract as an example. As you can see, it uses the OpenZeppelin implementation of the ERC20 standard:
pragma solidity 0.4.24;

import "openzeppelin-solidity/contracts/token/ERC20/StandardToken.sol";

contract MyLoomCoin is StandardToken {
    // Transfer Gateway contract address
    address public gateway;
    string public name = "MyLoomCoin";
    string public symbol = "MLC";
    uint8 public decimals = 18;

    constructor(address _gateway) public {
        gateway = _gateway;
        totalSupply_ = 0;
    }
// listing truncated for brevity
You can successfully compile this contract on your machine because npm install saved the OpenZeppelin contracts locally and Truffle "knows" where to find them. But, if you try to get this compiled on the block explorer, it'll just fail.
To make it work, we need to use a tool that merges all the dependencies, puts them in the right order, and saves everything in a single file - truffle-flattener.
Let's install it by running:
npm install truffle-flattener
Flattening Our Smart Contract
Now that we've installed truffle-flattener, it's time to do something with it. Let's flatten the MyLoomCoin smart contract by entering the following commands:
cd truffle
truffle-flattener contracts/MyLoomCoin.sol --output contracts/MyLoomCoinFlattened.sol
This will save the flattened contract into a file called MyLoomCoinFlattened.sol.
Let's take a look at what's inside:
cat contracts/MyLoomCoinFlattened.sol
// File: openzeppelin-solidity/contracts/token/ERC20/ERC20Basic.sol

pragma solidity ^0.4.24;


/**
 * @title ERC20Basic
 * @dev Simpler version of ERC20 interface
 * See https://github.com/ethereum/EIPs/issues/179
 */
contract ERC20Basic {
  function totalSupply() public view returns (uint256);
  function balanceOf(address _who) public view returns (uint256);
  function transfer(address _to, uint256 _value) public returns (bool);
  event Transfer(address indexed from, address indexed to, uint256 value);
}

// File: openzeppelin-solidity/contracts/math/SafeMath.sol

pragma solidity ^0.4.24;


/**
 * @title SafeMath
 * @dev Math operations with safety checks that throw on error
 */
library SafeMath {

// content truncated for brevity

/ File: contracts/MyLoomCoin.sol

pragma solidity 0.4.24;


contract MyLoomCoin is StandardToken {
    // Transfer Gateway contract address
    address public gateway;

    string public name = "MyLoomCoin";
    string public symbol = "MLC";
    uint8 public decimals = 18;

    constructor(address _gateway) public {
        gateway = _gateway;
        totalSupply_ = 0;
    }

    // Used by the DAppChain Gateway to mint tokens that have been deposited to the Ethereum Gateway
    function mintToGateway(uint256 _amount) public {
        require(msg.sender == gateway, "only the gateway is allowed to mint");
        totalSupply_ = totalSupply_.add(_amount);
        balances[gateway] = balances[gateway].add(_amount);
    }
}
As you can see, all dependencies are saved. There's one thing left to do here- change the name of the smart contract to MyLoomCoinFlattened:
sed -i '.backup' 's/contract MyLoomCoin/contract MyLoomCoinFlattened/g' contracts/MyLoomCoinFlattened.sol
The above command replaces the "contract MyLoomCoin" string with "contract MyLoomCoinFlattened" and saves the original file to contracts/MyLoomCoinFlattened.sol.backup.
Deploying Our Smart Contract
To deploy, we must first create a migration. Create a file called migrations/5_my_loom_coin_flattened.js with the following content:
const MyLoomCoinFlattened = artifacts.require('./MyLoomCoinFlattened.sol')

let gatewayAddress = '0xE754d9518bF4a9C63476891eF9Aa7D91c8236a5d'.toLowerCase()

module.exports = function (deployer, network, accounts) {
  if (network !== 'extdev') {
    return
  }

  deployer.then(async () => {
    await deployer.deploy(MyLoomCoinFlattened, gatewayAddress)
    const myLoomCoinFlattenedInstance = await MyLoomCoinFlattened.deployed()

    console.log('\n*************************************************************************\n')
    console.log(`MyLoomCoinFlattened Contract Address: ${myLoomCoinFlattenedInstance.address}`)
    console.log('\n*************************************************************************\n')
  })
}
Now, you can deploy the smart contract by entering this:
truffle migrate -f 5 --to 5 --network extdev
Verifying the Smart Contract on the Block Explorer
To verify the smart contract, point your web browser to the Extdev Block Explorer and type the address of the newly deployed smart contract in the search box.
Next, you should see a page similar to the one below:
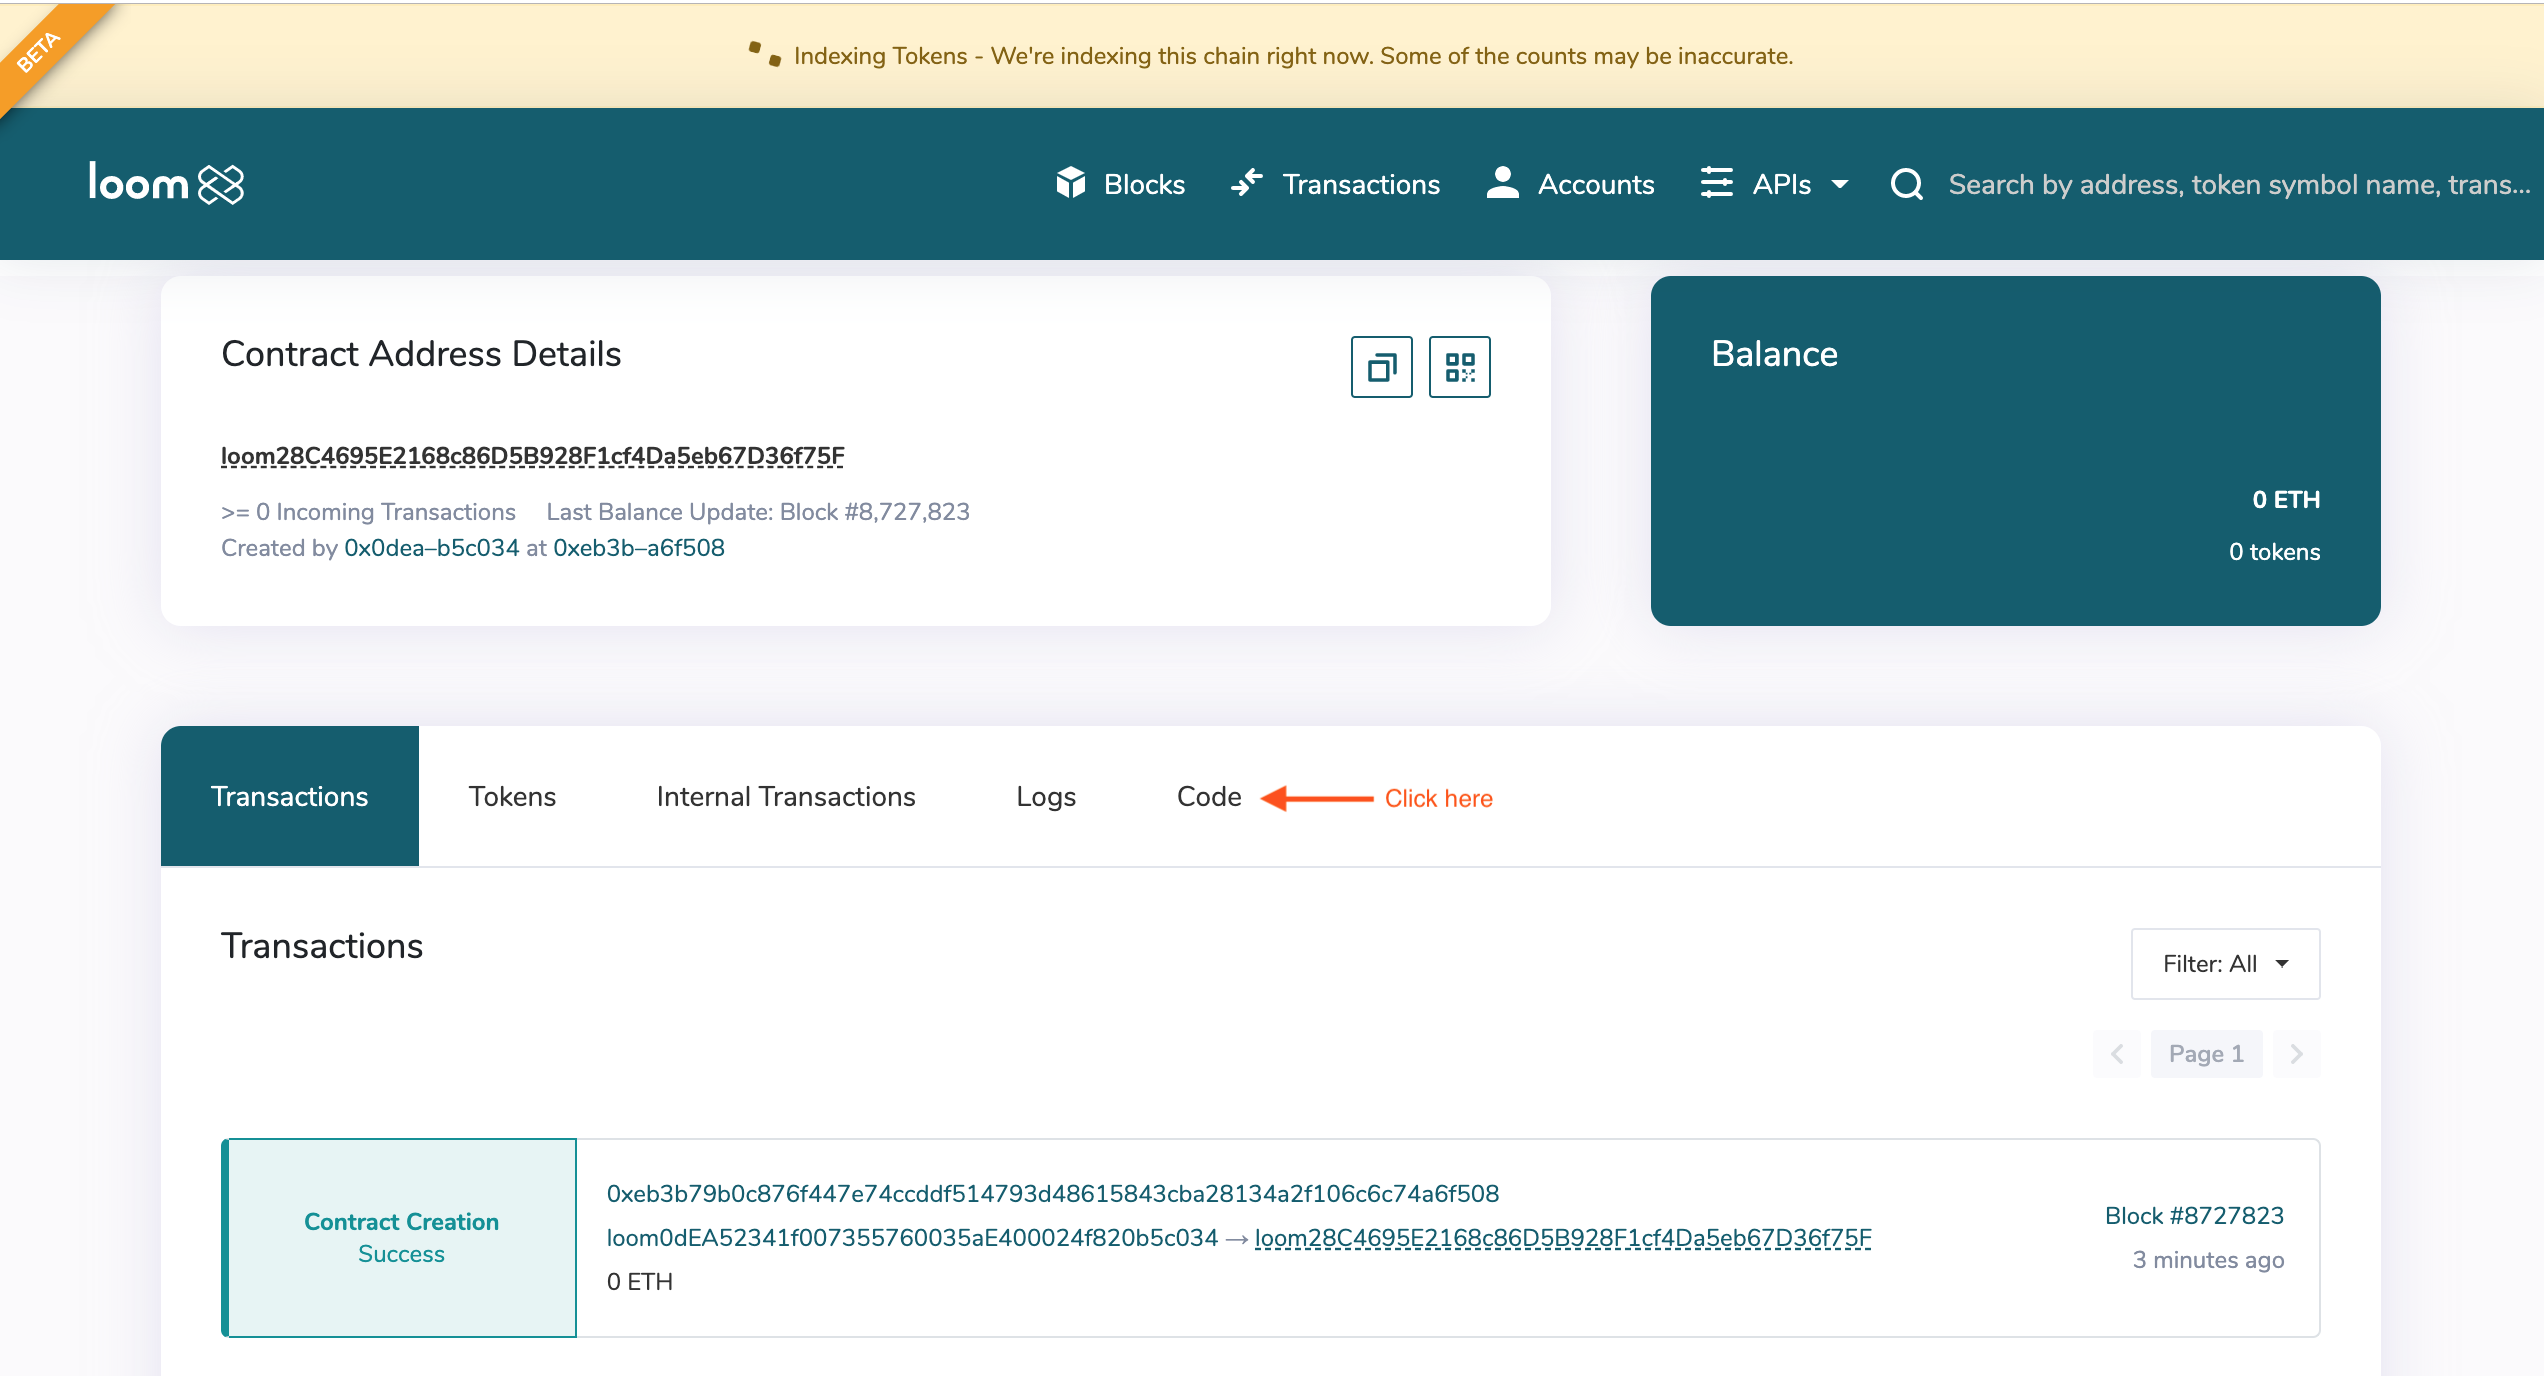
Just click "Code and you'll be redirected to a page containing details about the smart contract:
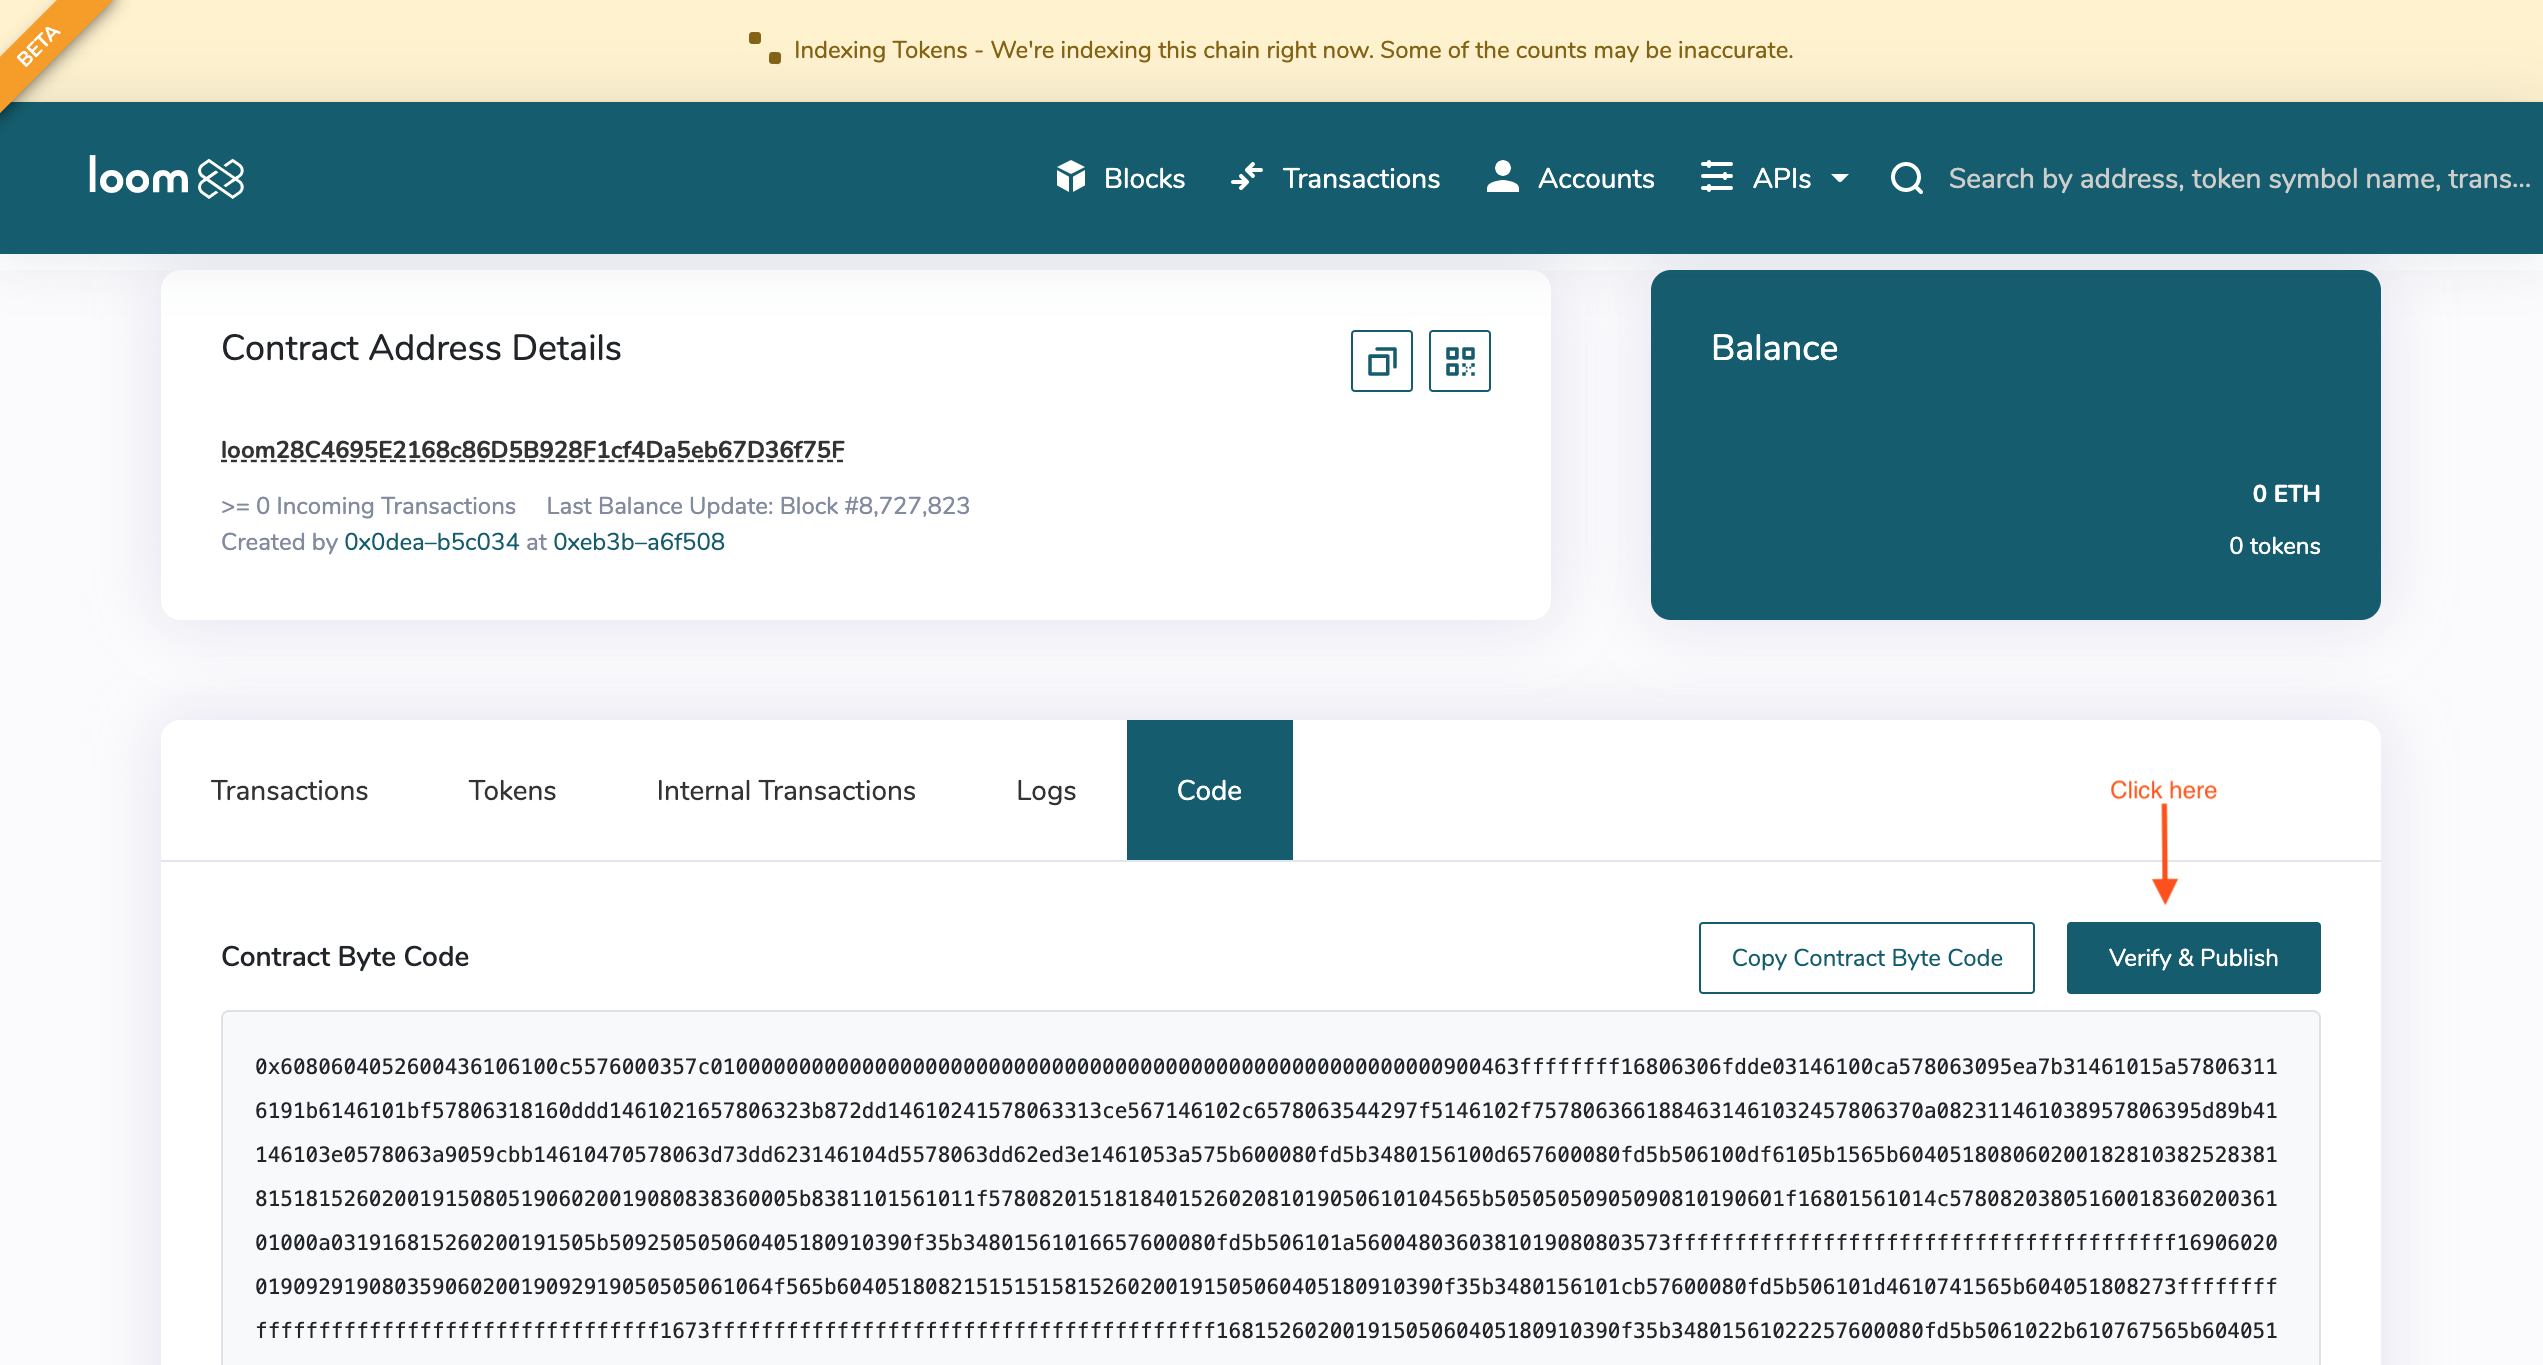
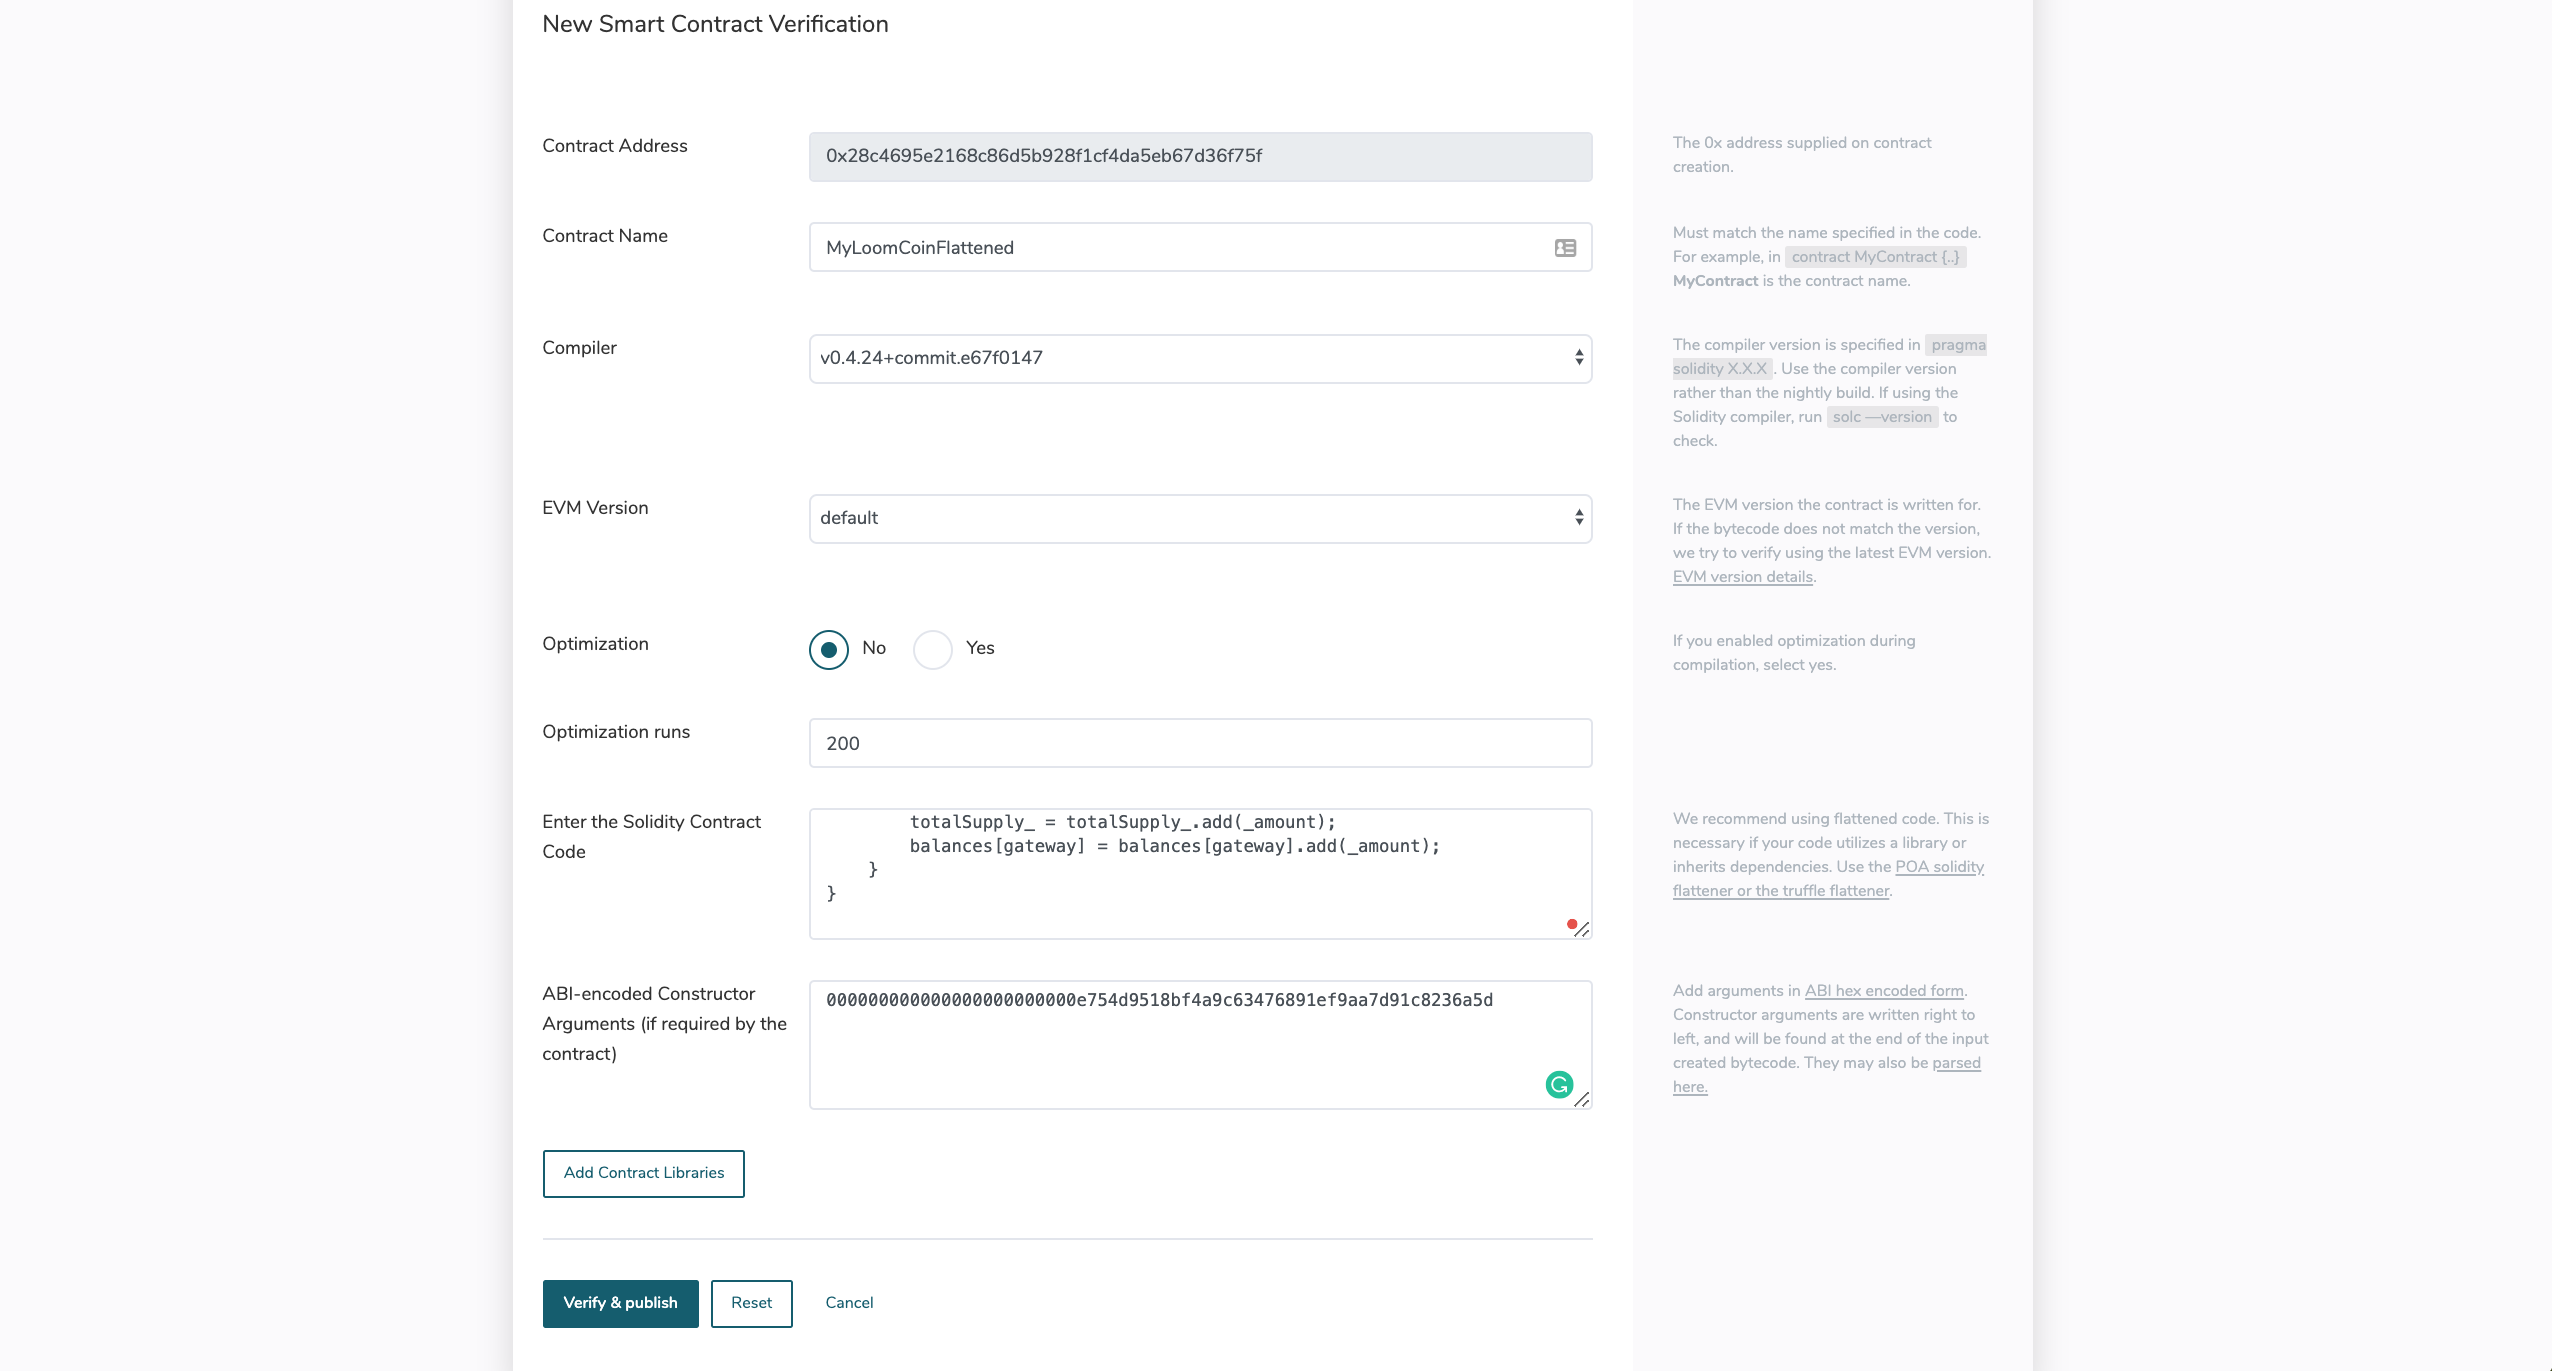
From here, click "Verify and Publish" and you'll be asked to fill in a bunch of fields:
- contract address: the address of the smart contract (in our case that's
0x28C4695E2168c86D5B928F1cf4Da5eb67D36f75Fbut yours will be different) - contract name: MyLoomCoinFlattened
- compiler: 0.4.24+commit.e67f0147
- EVM version: default
- optimization: No
Once you fill in these fields, go ahead and copy and paste the source of our smart contract into the "Enter the Solidity Contract Code" field.
At this point, we need to get the ABI encoded form of the constructor's arguments. Fortunately, you don't have to read the bytecode yourself because there's a service that helps with parsing these parameters- Hashex. Just head over to their website, set the function type to constructor, and manually add the parameter passed to our constructor:
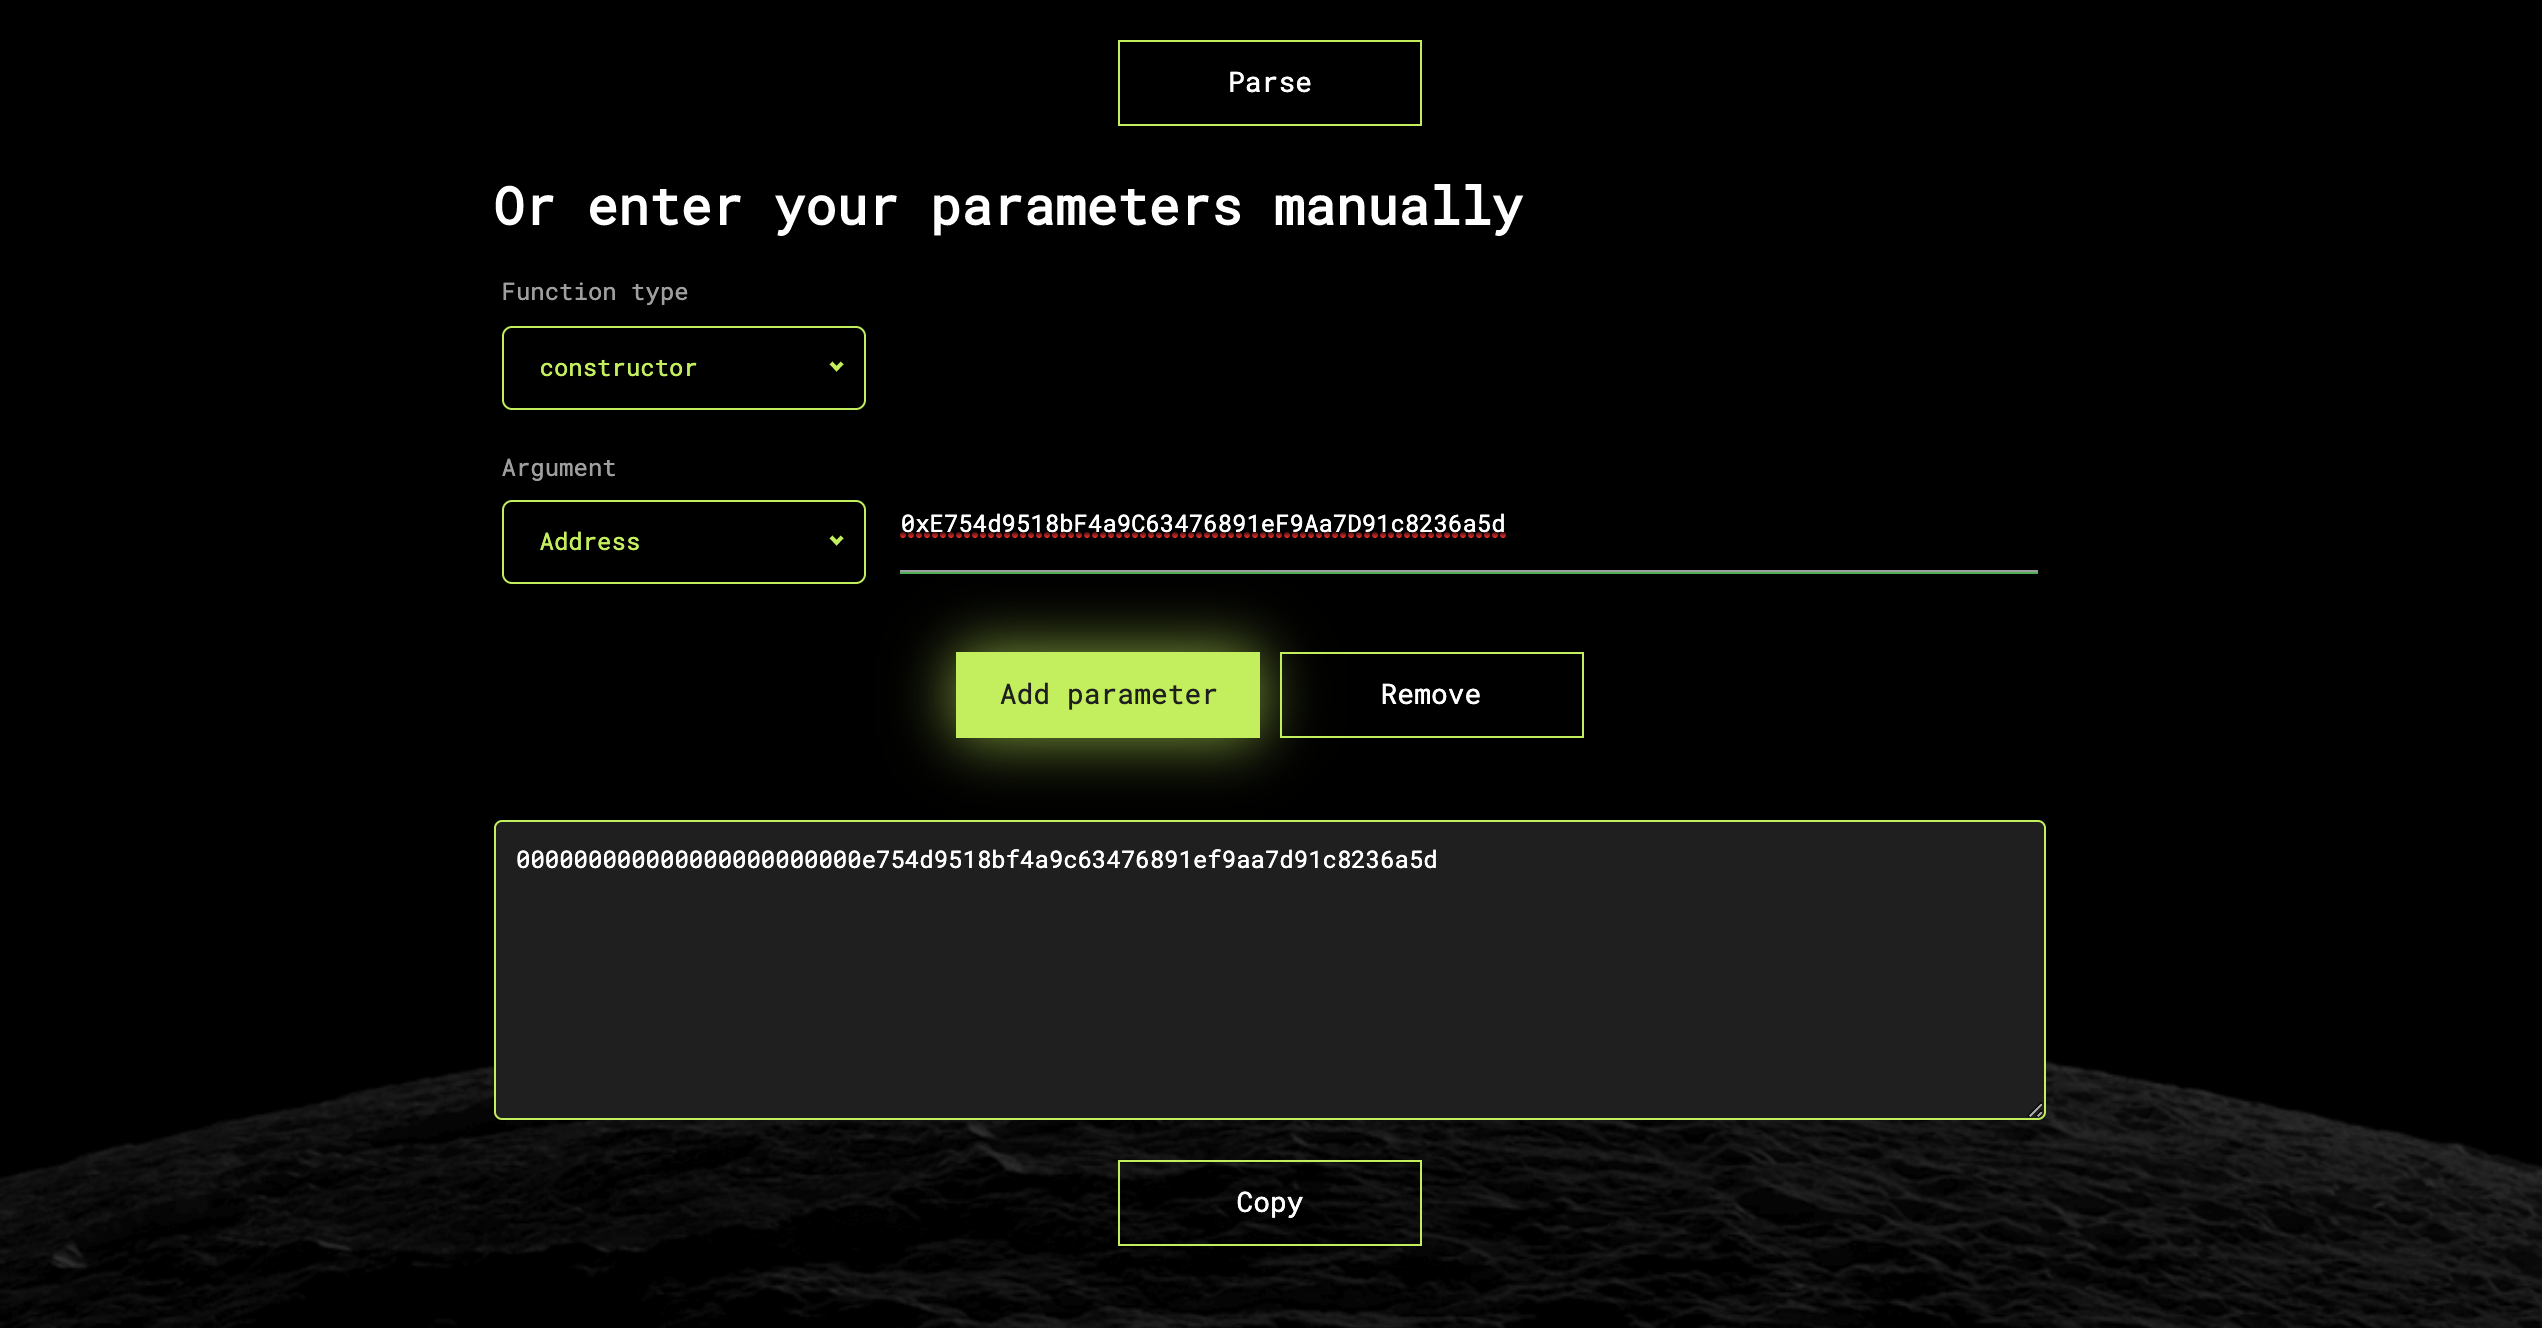
Now let's copy the value Hashex generated for us and paste it into the "ABI Encoded Constructor Arguments" field. Once you're done, the page should look similar to the following:
Great! Now just press "Verify and publish button" and wait a bit until the contract gets verified. Under the hood, the source code gets compiled and the resulting bytecode is compared to what's stored on the blockchain. If they match, the contract is verified, and you'll be redirected to a page similar to the following:
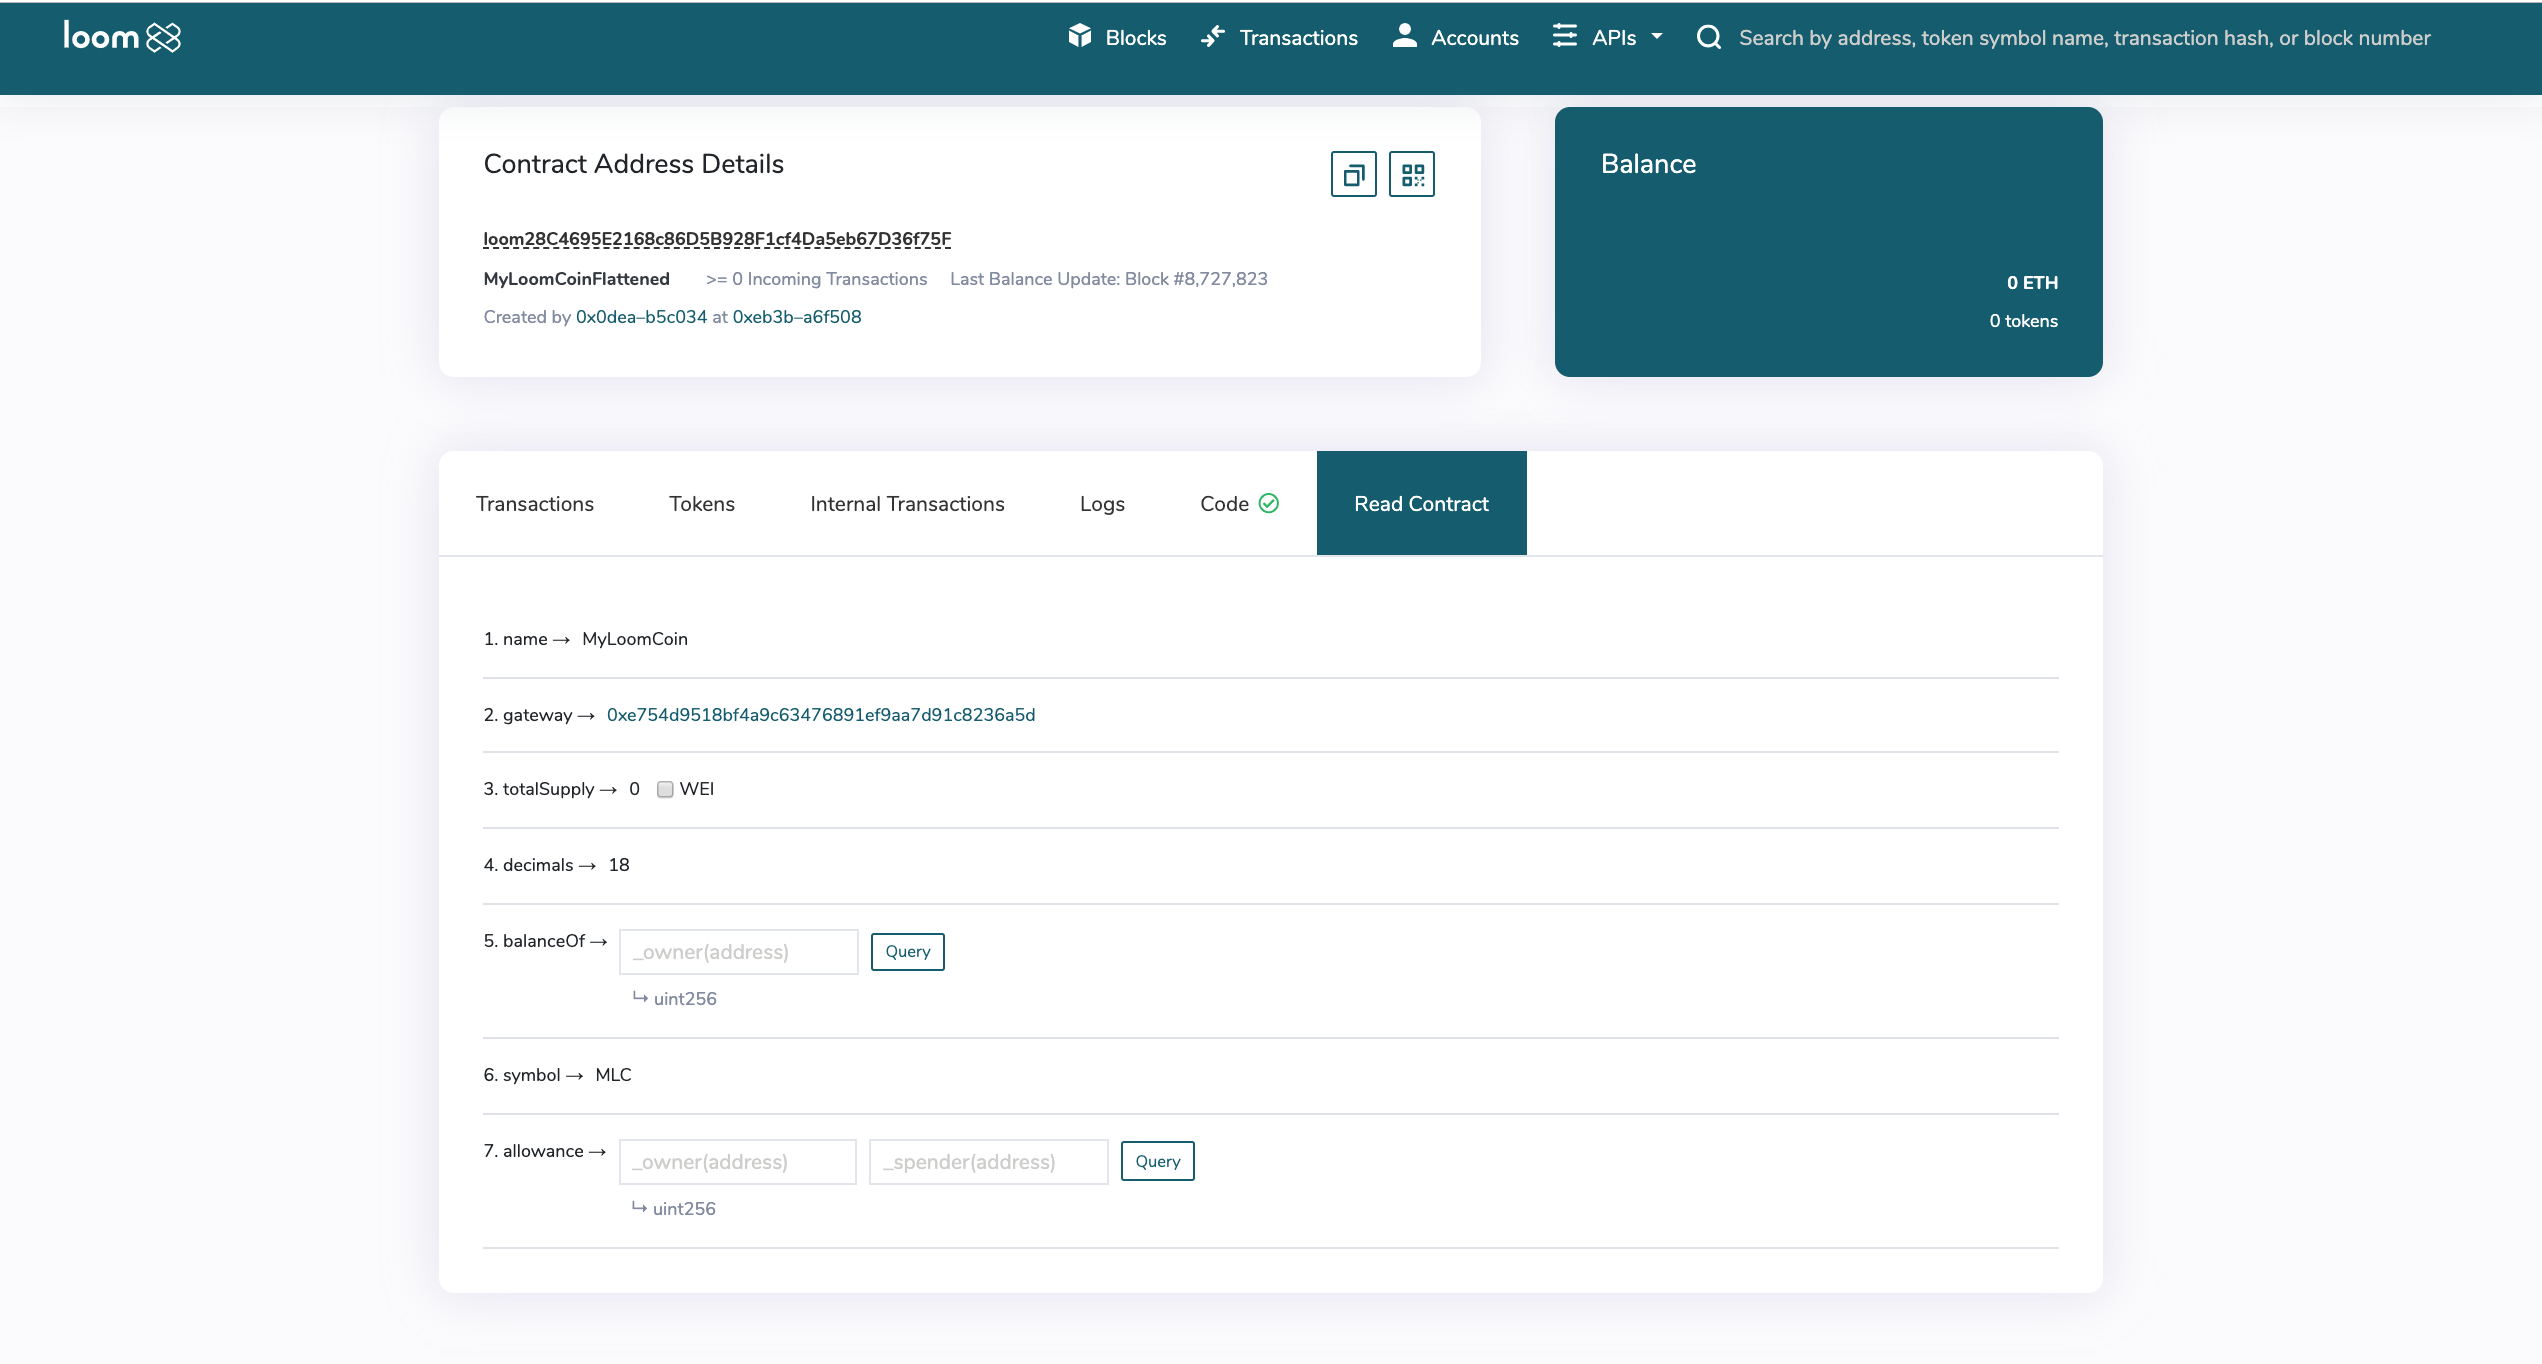
Congratulations! You've just verified your smart contract! Now everyone can make sure that there's no difference between the source code published on GitHub and the code running on the blockchain.
Please feel free to reach out to us on Telegram if you have any questions about this tutorial or just want to leave us feedback.